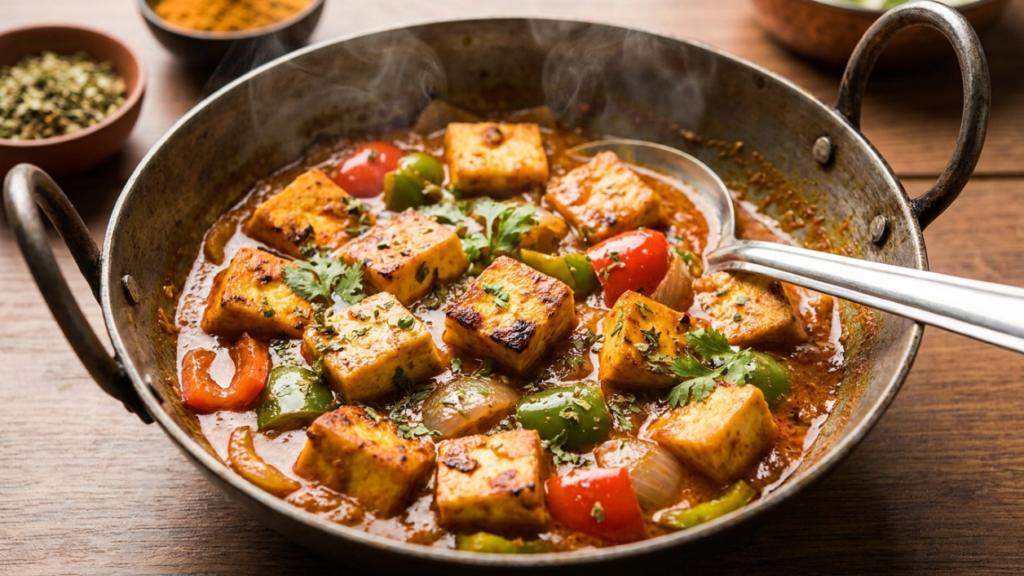
This Kadai Paneer Recipe brings together tender paneer, juicy tomatoes, crisp capsicum and a freshly ground spice mix in a bold, aromatic masala. The gravy is thick enough to cling to every cube without becoming heavy, while the vegetables retain the light crunch that makes the dish so satisfying.
The key is not extra chilli or cream; it is the quick roasting and coarse grinding of coriander seeds, dried red chillies, cumin and black pepper. That simple step creates layers of citrusy, smoky and warm spice. At Duniya World, we favour practical details, so the method explains heat levels, timing and visible doneness cues rather than asking you to guess.
This version serves four and takes 50 minutes from start to finish. It is designed for a regular kadai, wok or wide frying pan, uses easily available ingredients, and can be made semi-dry or lightly saucy without losing the character of the dish.
Table of Contents
- Kadai Paneer Recipe at a Glance
- What Is Kadai Paneer?
- Why This Restaurant Style Kadai Paneer Works
- Ingredients for Kadai Paneer Masala
- Easy Kadai Paneer: Detailed Instructions
- Expert Tips for the Best Kadai Paneer Recipe
- Common Mistakes and How to Avoid Them
- Variations and Practical Substitutions
- Serving Suggestions
- Storage, Freezing and Reheating
- Approximate Nutrition per Serving
- Bring the Kadai to the Table
- Frequently Asked Questions
Kadai Paneer Recipe at a Glance
| Detail | Information |
|---|---|
| Prep time | 20 minutes |
| Cook time | 30 minutes |
| Total time | 50 minutes |
| Servings | 4 |
| Course | Main course |
| Cuisine | North Indian restaurant-style |
| Diet | Vegetarian |
| Method | Stovetop |
What Is Kadai Paneer?
Kadai paneer is a North Indian-style paneer dish cooked with tomato, onion, capsicum and an aromatic ground masala. Its name comes from the kadai, a deep, round Indian cooking pan with sloping sides. A wide wok or heavy frying pan gives similar results because it allows moisture to evaporate quickly and the vegetables to fry rather than steam.
The dish is strongly associated with Punjabi, dhaba and restaurant cooking, but recipes vary across homes and eateries; it is more accurate to describe it as a popular North Indian restaurant-style preparation than to claim one fixed birthplace. Some versions are nearly dry, while others have enough gravy for rice. All should feature distinct tomato, capsicum and freshly crushed coriander-chilli notes.
Unlike smooth, mild restaurant-style paneer butter masala, this curry is textured, capsicum-forward and more robustly spiced. It also differs from creamy palak paneer, where spinach forms the base. These distinctions help set the right expectation before you start cooking.
Why This Restaurant Style Kadai Paneer Works
- Freshly roasted spice: Whole spices are toasted only until fragrant, then ground coarsely. The texture and volatile aromas give the curry its defining character.
- Balanced tomato base: Ripe tomatoes cook until glossy and concentrated, removing their raw edge without requiring sugar.
- Capsicum with bite: Onion petals and capsicum are flash-fried separately, so they stay bright and lightly crisp instead of dissolving into the gravy.
- Tender paneer: The cubes simmer briefly over low heat. Long cooking is avoided because it can make paneer firm and chewy.
- Flexible richness: Ghee and cream are optional. The standard masala is full-flavoured without either, while both can be added for a rounder restaurant finish.
Ingredients for Kadai Paneer Masala
For the Fresh Kadai Masala
- 2 tablespoons coriander seeds: The main flavour of the blend; they become citrusy and nutty when gently roasted.
- 3 dried Kashmiri red chillies, broken: These supply colour and mild warmth. Shake out most seeds for a gentler result.
- 1 teaspoon cumin seeds: Adds an earthy backbone.
- 1/2 teaspoon black peppercorns: Gives clean heat without overpowering the tomato.
For the Paneer and Vegetables
- 300 g paneer, cut into 2 cm cubes: Use fresh, full-fat paneer for the softest texture.
- 1 medium green capsicum, about 150 g: Cut it into 2 cm squares so it cooks evenly but stays crisp.
- 1 medium onion, about 100 g: Separate it into broad petals for flash-frying.
- 2 tablespoons neutral oil: Divide it between the vegetables and gravy. Groundnut, sunflower or rice bran oil works well.
For the Tomato Gravy and Finish
- 1 large onion, about 150 g, finely chopped: This builds body and savouriness.
- 1 tablespoon ginger-garlic paste: Cook it until the raw aroma disappears.
- 4 medium ripe tomatoes, about 400 g, pureed: Choose red, flavourful tomatoes rather than watery ones.
- 1/2 teaspoon turmeric powder and 1/2 teaspoon Kashmiri red chilli powder: These deepen the colour and warmth.
- 1 teaspoon fine salt, or to taste: Paneer brands vary in saltiness, so adjust only after adding the cheese.
- 1/2 cup water, 120 ml: This produces a thick, coating gravy.
- 1 tablespoon ghee, optional: Adds a rounded dairy aroma.
- 1 green chilli, slit, optional: Use it for fresh chilli heat.
- 1 teaspoon kasuri methi, crushed: Rub the dried fenugreek leaves between your palms to release their aroma.
- 1/2 teaspoon garam masala: A small amount rounds out the finish.
- 2 tablespoons fresh cream, 30 ml, optional: Softens the spices without turning the curry sweet.
- 1 tablespoon ginger juliennes and 2 tablespoons chopped fresh coriander: Add freshness and contrast.
- 1 teaspoon lemon juice, optional: Use only if the cooked tomatoes need a brighter finish.
Easy Kadai Paneer: Detailed Instructions
Step 1: Roast and Grind the Kadai Masala
Place a dry kadai or frying pan over low heat. Add the coriander seeds, dried Kashmiri red chillies, cumin seeds and black peppercorns. Roast for 2 to 3 minutes, stirring continuously, until the coriander smells nutty and the chillies deepen slightly in colour. Do not let the spices blacken; burnt coriander will make the entire curry bitter.
Immediately transfer the spices to a plate so the hot pan does not continue cooking them. Cool for about 5 minutes, then pulse in a spice grinder or pound with a mortar and pestle to a coarse, sandy mixture. Do not make a fine powder. The small flecks are an important part of the finished texture.
Step 2: Prepare and Flash-Fry the Vegetables
While the spices cool, cube the paneer, cut the capsicum, separate the onion petals, finely chop the large onion and puree the tomatoes. Keeping everything ready matters because the high-heat stages move quickly.
Heat 1 teaspoon of the measured oil in the kadai over medium-high heat. Add the capsicum squares and onion petals. Stir-fry for 3 to 4 minutes, tossing often, until their edges show a few brown spots but the centres remain crisp. Transfer them to a clean plate. Take care around the hot oil and hold the kadai handle securely while tossing.
Step 3: Build the Onion Base
Reduce the heat to medium. Add the remaining 1 tablespoon plus 2 teaspoons oil to the same pan, along with the optional ghee if using. Add the finely chopped onion and cook for 5 to 6 minutes, stirring regularly, until soft and light golden. If it catches, lower the heat rather than adding water immediately.
Add the ginger-garlic paste and cook for 1 minute. It is ready when the sharp raw smell fades and the paste no longer looks wet. Do not brown it deeply, as burnt garlic can introduce harshness.
Step 4: Cook the Tomato Masala Properly
Lower the heat briefly and add the tomato puree, turmeric, Kashmiri red chilli powder and salt; the puree may splutter when it meets the hot pan. Return to medium heat and cook for 8 to 10 minutes, stirring more frequently as it thickens. The masala is ready when it has reduced noticeably, looks glossy, and small beads of fat appear at the edges. This stage removes the raw, sour taste of tomato.
Step 5: Form the Gravy
Add about three-quarters of the ground kadai masala, reserving the rest for the finish. Stir for 30 seconds, then pour in 1/2 cup water. Scrape the flavourful browned bits from the base of the pan and bring the gravy to a gentle simmer. Cook uncovered for 3 to 4 minutes, until it is thick but still moves easily when stirred.
Taste carefully. The gravy should be savoury, tomato-rich and aromatic, with a warm chilli finish. It will thicken further after paneer is added, so loosen it with 1 to 2 tablespoons hot water only if it already looks dry.
Step 6: Add Paneer and Finish
Lower the heat. Fold in the paneer cubes, flash-fried capsicum and onion petals, optional slit green chilli, crushed kasuri methi, garam masala and remaining kadai masala. Simmer gently for 3 to 4 minutes, turning the paneer carefully so the cubes do not break. Avoid a vigorous boil; the paneer only needs to heat through and absorb the surface flavours.
Switch off the heat. Stir in the optional cream, ginger juliennes, chopped coriander and optional lemon juice. Taste once more and adjust salt. Rest the curry, covered, for 3 minutes before serving; this lets the paneer settle into the gravy while the capsicum keeps its bite.
Expert Tips for the Best Kadai Paneer Recipe
- Use a wide pan: Crowding traps steam. A broad surface helps the tomato reduce and gives the vegetables quick colour.
- Control the roast: Keep whole spices moving over low heat and remove them as soon as they smell fragrant. Residual pan heat can scorch them.
- Grind coarsely: A fine commercial-style powder loses the rustic pops of coriander that distinguish kadai masala.
- Choose firm-ripe tomatoes: Very sour tomatoes can dominate. Cook them fully before deciding whether the optional lemon is needed.
- Revive firm paneer: If packaged paneer feels hard, soak the intact block in warm water for 10 minutes, drain, then cube it. Pat it dry before it goes near hot oil.
- Add cream off heat: This protects its smooth texture and keeps the fresh spices noticeable.
Common Mistakes and How to Avoid Them
| Problem | Likely cause | Simple fix |
|---|---|---|
| Bitter gravy | Spices or garlic scorched | Roast spices on low and cook garlic only until its raw smell fades. |
| Watery curry | Tomato was not reduced enough | Cook uncovered until glossy before adding measured water. |
| Rubbery paneer | Paneer boiled too long | Add it at the end and simmer gently for no more than 4 minutes. |
| Soft capsicum | Vegetables steamed in the gravy | Flash-fry separately and return them only at the finish. |
| Flat flavour | Old spice or insufficient salt | Use aromatic whole spices and make the final salt adjustment after paneer is added. |
| Overly thick masala | Too much evaporation | Add hot water 1 tablespoon at a time; cold water interrupts the simmer. |
Variations and Practical Substitutions
Semi-Dry Kadai Paneer
Use only 1/4 cup water and stop cooking when the masala coats the paneer and vegetables with almost no loose gravy. Keep the heat low after adding paneer so the reduced sauce does not catch. This version is especially good with breads and makes a useful filling for wraps.
More Gravy
For a saucier paneer capsicum curry, increase the water to 3/4 cup and simmer the sauce for an extra 2 minutes before adding the paneer. Do not increase every spice automatically; the fresh kadai masala is assertive enough for the additional liquid.
Dairy-Free Version
Replace paneer with 300 g extra-firm tofu, omit the ghee and cream, and use all neutral oil. Press and pat the tofu dry before cubing it. The result is a variation rather than traditional kadai paneer, but the tomato-capsicum masala and cooking sequence still work well.
Ingredient Swaps
Red or yellow capsicum may replace green capsicum for a sweeter profile. If Kashmiri chillies are unavailable, use two mild dried red chillies and rely on the Kashmiri chilli powder for colour. Fresh tomatoes give the best lively flavour, but an equal weight of unsalted canned crushed tomatoes can work when fresh tomatoes are pale or out of season.
Serving Suggestions
Serve this Kadai Paneer Recipe immediately with tandoori roti, naan, phulka or paratha. Its textured gravy is excellent with bread, while fluffy restaurant-style jeera rice absorbs the tomato masala without competing with the spices.
For a fuller vegetarian meal, add cucumber-onion salad, plain curd and a simple rice dish such as easy vegetable pulao. Keep accompaniments lightly seasoned because the curry is already aromatic and bold. A squeeze of lemon should be offered separately rather than added to every portion.
Storage, Freezing and Reheating
Cool leftovers promptly and transfer them to a shallow, airtight container. Refrigerate within 2 hours and use within 3 days. The USDA guidance on leftovers and safe reheating gives a general refrigerator window of 3 to 4 days and recommends reheating leftovers to 74°C (165°F).
Reheat only the amount you need in a covered pan over low heat, adding 1 or 2 tablespoons of water to loosen the gravy. Stir gently until steaming throughout and, for a precise safety check, the centre reaches 74°C (165°F). Avoid repeated reheating, which makes paneer tough and capsicum limp.
You can freeze the finished curry for up to 1 month in a freezer-safe container, although paneer may become slightly crumbly and capsicum will soften. For better texture, freeze just the cooked tomato gravy, thaw it overnight in the refrigerator, bring it to a simmer, and add freshly flash-fried vegetables and paneer. Do not add cream before freezing; stir it in after reheating.
Approximate Nutrition per Serving
| Nutrient | Approximate amount |
|---|---|
| Energy | 425 calories |
| Carbohydrate | 20 g |
| Protein | 17 g |
| Fat | 31 g |
| Saturated fat | 16 g |
| Fibre | 5 g |
| Sugars | 9 g |
| Sodium | 780 mg |
| Cholesterol | 55 mg |
Nutrition is an estimate per one-fourth of the recipe and assumes the optional ghee and cream are included. Actual values vary with the paneer brand, produce, oil absorption and salt used; substitutions will change the figures.
Bring the Kadai to the Table
A memorable Kadai Paneer Recipe depends on three manageable details: freshly crushed masala, properly reduced tomato and brief cooking after the paneer goes in. Follow those cues and you will get a bright, aromatic curry with tender cubes and crisp vegetables. Try it with your favourite bread or rice, then share your result or questions in the comments.
Frequently Asked Questions
Do I need a traditional kadai to make kadai paneer?
No. A wide, heavy frying pan or wok is a good substitute because its broad surface encourages fast evaporation and browning. Avoid a small saucepan, which crowds the vegetables and makes them steam. A flat cast-iron skillet also works, though you may need to stir more carefully to contain the sauce.
Can I use homemade paneer in this recipe?
Yes, homemade paneer works very well when it is properly drained and firm enough to cube. Do not press it until completely dry; a little retained moisture keeps the pieces tender during their short simmer. Cut delicate homemade paneer slightly larger than packaged paneer so it is less likely to break while folding.
Why did the cream split in my kadai paneer?
Cream can split when it is cold or boiled in an acidic tomato gravy. Let it approach room temperature, switch off the heat, stir a spoonful of warm gravy into it, and then fold it gently into the pan.
How can I adapt kadai paneer for children?
Remove the seeds from the dried chillies, omit the slit green chilli and reduce the black pepper to a few peppercorns. Keep the coriander and cumin unchanged so the dish remains aromatic rather than bland.
Can I double this Kadai Paneer Recipe for guests?
Yes, double all ingredients but use a very wide pan or cook the vegetables in two batches. Allow a little extra time for the tomato puree to reduce, and add paneer only after the larger batch of gravy has reached the correct thick consistency.
Is kadai paneer naturally gluten-free?
The ingredients in this version contain no wheat, barley or rye. If gluten avoidance is medically necessary, check packaged paneer, ground spices and kasuri methi for advisory labels, and prevent cross-contact with shared utensils and breads.