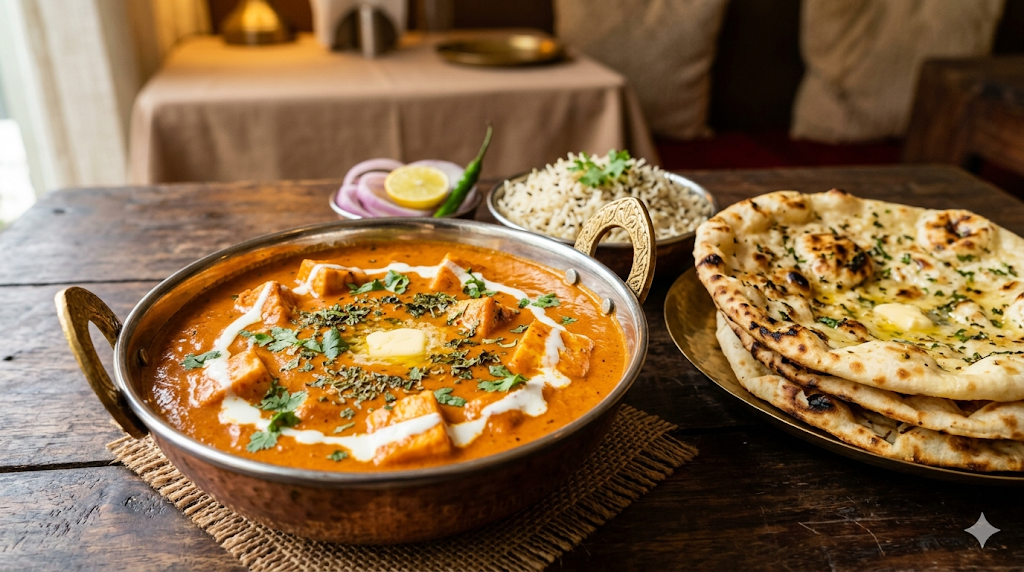
Have you ever sat in a dimly lit Indian restaurant, torn a piece of warm, buttery naan, and dipped it into a bowl of glowing, orange gravy? That first bite of Paneer Butter Masala is pure magic. It’s rich, it’s velvety, and it has that perfect balance of tangy tomato and sweet cream.
But here is a secret: you don’t need a professional chef’s kitchen to recreate that magic.
In this guide, I am going to show you how to make a restaurant-style Paneer Butter Masala right in your own home. Whether you are a beginner or a seasoned home cook, this recipe is designed to give you that authentic “Makhani” flavor every single time.
Why You Will Love This Recipe
There are a thousand recipes for paneer online, so why this one?
- Authentic Flavor: We aren’t cutting corners. We use the real deal—cashews, butter, and cream.
- Simple Steps: I’ve broken down the “scary” restaurant techniques into easy, bite-sized instructions.
- Perfect for Crowds: It’s naturally vegetarian and a universal favorite for kids and adults alike.
- Meal-Prep Friendly: The gravy actually tastes better the next day!
What is Paneer Butter Masala?
Before we jump into the pots and pans, let’s talk about what this dish actually is. Often confused with Paneer Tikka Masala, Paneer Butter Masala (also known as Paneer Makhani) is much smoother and slightly sweeter.
The base is a “Makhani” gravy. Makhan means butter in Hindi. The sauce is made by simmering tomatoes, ginger, garlic, and cashews into a thick paste, which is then blended and strained to achieve a silk-like texture.
The Ingredients You’ll Need
To get that deep, complex flavor, we need a mix of fresh ingredients and dry spices. Don’t worry—most of these are already in your pantry!
The Main Stars
- Paneer (Indian Cottage Cheese): 250g, cut into cubes. (Pro tip: use fresh malai paneer if possible).
- Butter: 3 tablespoons (unsalted is best so you can control the salt).
- Oil: 1 tablespoon (this prevents the butter from burning).
For the Gravy Base
- Tomatoes: 4 large, ripe, red tomatoes (Roughly chopped).
- Onions: 1 medium onion (Sliced).
- Cashews: 12-15 whole cashews (This is what makes it creamy!).
- Ginger & Garlic: 1-inch piece of ginger and 4-5 cloves of garlic.
- Whole Spices: 1 green cardamom, 1-inch cinnamon stick, and 2 cloves.
The Spices & Finishing Touches
- Kashmiri Red Chili Powder: 1 teaspoon (This gives the color without too much heat).
- Garam Masala: ½ teaspoon.
- Turmeric Powder: ¼ teaspoon.
- Sugar or Honey: 1 teaspoon (To balance the acidity of the tomatoes).
- Kasuri Methi (Dried Fenugreek Leaves): 1 tablespoon (The “secret” ingredient).
- Heavy Cream: 2-3 tablespoons.
- Salt: To taste.
Step-by-Step Instructions
Follow these steps closely, and you will have a masterpiece on your dinner table in about 30 minutes.
Step 1: Prepare the Gravy Base
First, heat 1 tablespoon of oil and 1 tablespoon of butter in a large pan over medium heat. Add the whole spices (cardamom, cinnamon, cloves). Once they smell fragrant, add the onions, ginger, and garlic. Sauté for 2-3 minutes until the onions turn translucent.
Step 2: Simmer the Tomatoes and Cashews
Add the chopped tomatoes and the cashews to the pan. Sprinkle a little salt. Pour in about half a cup of water. Cover the pan and let it simmer for 10-12 minutes. You want the tomatoes to be completely mushy and the cashews to be soft.
Step 3: Blend to Perfection
Turn off the heat and let the mixture cool down. Once cooled, remove the cinnamon stick and cloves. Transfer the rest to a blender. Blend until it is a super smooth puree. SEO Hint: For a truly restaurant-style texture, pass this puree through a fine-mesh strainer into a bowl. This removes any tomato skin or seeds.
Step 4: The Final Sauté
Clean the same pan and heat the remaining 2 tablespoons of butter. Add the Kashmiri red chili powder directly to the butter (this blooms the color). Quickly pour in the blended tomato-cashew puree so the chili doesn’t burn.
Step 5: Seasoning the Curry
Add the turmeric and salt. Let the gravy simmer on low heat for 5-7 minutes. You will notice the fat starting to separate from the sides of the gravy. This is when you know the spices are cooked.
Step 6: Adding the Paneer
Add your paneer cubes. If your paneer is a bit hard, soak the cubes in warm water for 10 minutes before adding them. Mix gently so you don’t break the paneer.
Step 7: The “Magic” Finish
Crush the Kasuri Methi between your palms and sprinkle it over the curry. Add the garam masala and the sugar/honey. Finally, stir in the heavy cream. Turn off the heat immediately to keep the cream from curdling.
Pro Tips for the Best Results
- Don’t Skimp on Cashews: If you have a nut allergy, you can use melon seeds or extra cream, but cashews provide a specific “weight” to the sauce that is hard to mimic.
- The Tomato Ratio: Always use red, ripe tomatoes. If your tomatoes are too sour, add an extra teaspoon of sugar.
- Kasuri Methi is Mandatory: You cannot make authentic Paneer Butter Masala without dried fenugreek leaves. It provides that smoky, floral aroma found in high-end Indian restaurants.
- Paneer Texture: Never overcook paneer. It only needs 2-3 minutes in the hot gravy to become soft. If you cook it too long, it becomes rubbery.
Variations to Try
1. The Healthy Version
If you want to cut down on calories, replace the heavy cream with whisked Greek yogurt (add it off the heat). Use olive oil instead of butter, though the flavor will change slightly.
2. The Vegan Option
Replace paneer with extra-firm tofu. Instead of butter, use vegan butter or coconut oil. For the creaminess, use full-fat coconut milk or cashew cream.
3. The Spicy Twist
Traditional Paneer Butter Masala is mild. If you like heat, add 1-2 slit green chilies during Step 4.
Serving Suggestions
What is a curry without its companions? Here is how to serve this dish:
- Bread: Pair it with Garlic Naan, Butter Roti, or Laccha Paratha.
- Rice: It goes beautifully with Jeera Rice (Cumin Rice) or a simple vegetable Pulao.
- Salad: A side of sliced onions with a squeeze of lemon and a dash of chaat masala adds a refreshing crunch.
- Drink: A cold glass of Mango Lassi perfectly complements the rich flavors.
Storage and Reheating
Fridge: Store in an airtight container for up to 3 days. The gravy will thicken as it sits. Freezer: You can freeze the gravy base (before adding paneer and cream) for up to a month. Reheating: Heat on the stovetop over low heat. Add a splash of water or milk to loosen the gravy back to its original consistency.
Nutritional Information
Per serving (approximate values based on 4 servings)
| Nutrient | Amount |
|---|---|
| Calories | 345 kcal |
| Total Fat | 28g |
| Saturated Fat | 14g |
| Cholesterol | 65mg |
| Sodium | 450mg |
| Carbohydrates | 12g |
| Fiber | 3g |
| Sugar | 5g |
| Protein | 14g |
Frequently Asked Questions
1. Is Paneer Butter Masala the same as Paneer Tikka Masala?
No. Paneer Tikka Masala uses grilled (tikka) paneer and a chunkier, spicier onion-tomato gravy. Paneer Butter Masala is smoother, creamier, and milder.
2. Can I make this without an onion?
Yes! You can skip the onion entirely. Many “Jain” versions of this recipe omit both onion and garlic, relying solely on tomatoes and cashews for the base.
3. Why is my gravy grainy?
This usually happens if the cashews weren’t blended well enough or if you didn’t strain the puree. Always use a high-speed blender and a sieve for that “velvet” feel.
4. Can I use frozen paneer?
Yes. Just make sure to thaw it in warm water for 15-20 minutes before adding it to the curry so it stays soft.
5. What can I use instead of cream?
You can use malai (homemade milk cream), coconut milk, or a paste of soaked cashews and milk.
Conclusion
Making a Restaurant Style Paneer Butter Masala at home is one of the most rewarding cooking projects you can take on. It smells incredible, tastes like a dream, and is guaranteed to impress anyone sitting at your table.
If you tried this recipe, I would love to hear how it turned out! Leave a comment below or share a photo on Instagram and tag us. Happy cooking!